
Layout
Tessel arranges views with stacks: you put views in a row, a column or a pile, and nest stacks inside each other to build any layout.
app Inbox(width: 340, height: 220) {    state messages = ["Lunch on Friday?", "Your order has shipped", "Meeting notes",        "Photos from the trip", "Invoice #1042", "Welcome to Tessel"]
    VStack(spacing: 0) {        HStack {            Text("Inbox").font(size: 17, weight: .bold)            Spacer()            Button("New") { messages.insert("New message", at: 0) }        }        .padding(12)        Divider()        Scroll {            VStack(spacing: 0, alignment: .leading) {                for m in messages {                    Text(m).padding(horizontal: 12, vertical: 8)                }            }        }    }}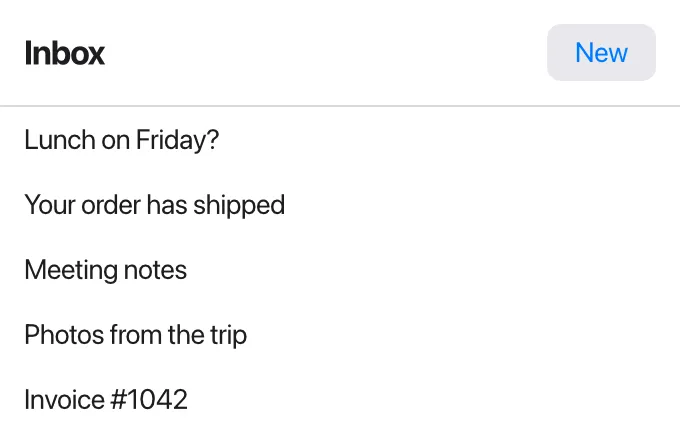
The rest of this page goes through each piece.
Stacks
Section titled “Stacks”| Stack | Arranges its children |
|---|---|
VStack { … } | top to bottom |
HStack { … } | left to right |
ZStack { … } | on top of each other, the first one at the back |
VStack { Text("Name") HStack { Text("First") Text("Last") } ZStack { Text("Behind").font(size: 30).color(.lightGray) Text("In front") }}A stack is just big enough for its children. By default it centers them: a
VStack centers each child horizontally, an HStack vertically. You can change
that with alignment:; see Alignment.
The body of an app or view works like a VStack too: its views go from
top to bottom, 8 points apart, centered.
Spacing
Section titled “Spacing”VStack and HStack put 8 points between their children. Pass spacing: to
change that:
VStack(spacing: 0) { Text("Tight") Text("lines")}HStack(spacing: 24) { Text("Far") Text("apart")}The spacing goes between children only, not before the first or after the
last. Hidden views (see .hidden) don’t
count.
Spacer
Section titled “Spacer”Spacer() is empty space that grows. In an HStack it grows sideways, in a
VStack up and down, pushing the other views apart:
HStack { Text("Left") Spacer() Text("Right")}With two or more spacers in the same stack, the free space is shared equally
between them. A Spacer with a fixed size is a handy way to make a gap of a
certain width:
HStack(spacing: 0) { Spacer().frame(width: 20) Text("Indented by 20 points")}Divider
Section titled “Divider”Divider() draws a thin line across its stack: a horizontal line in a
VStack, a vertical one in an HStack. It stretches to the stack’s full width
(or height), so it separates sections cleanly:
VStack(spacing: 0) { Text("Toolbar").padding(8) Divider() Text("Content").padding(8)}Scroll
Section titled “Scroll”Scroll { … } shows content that may be taller than the space available, and
lets the user scroll it with the mouse wheel or trackpad:
Scroll { VStack(alignment: .leading) { for i in 0..100 { Text("Line {i}") } }}A Scroll takes all the space it’s offered, and its content starts at the top
left. Scrolling is vertical only. If you put several views directly inside a
Scroll, it stacks them downwards, 8 points apart, as a VStack with
.leading alignment would.
Padding
Section titled “Padding”.padding adds space around a view, inside its background and border. You
can pad every edge, the two axes, or single edges:
Text("padding()").padding().background(.lightGray)Text("padding(16)").padding(16).background(.lightGray)Text("padding(horizontal: 24, vertical: 4)") .padding(horizontal: 24, vertical: 4) .background(.lightGray)Text("padding(leading: 40)").padding(leading: 40).background(.lightGray)Text("padding(4, bottom: 20)").padding(4, bottom: 20).background(.lightGray)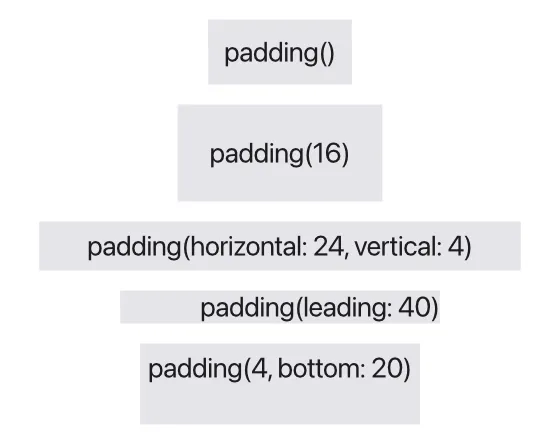
The rules:
.padding()with nothing in the parentheses pads every edge by 8 points..padding(16)pads every edge by 16.horizontal:sets the leading and trailing edges;vertical:sets the top and bottom.top:,leading:,bottom:andtrailing:set one edge each. (Leading is the left edge, trailing the right.)- When you name some edges, the edges you don’t name get 0, unless you also
give a first amount for them:
.padding(4, bottom: 20)is 4 everywhere except the bottom. The most specific value wins. - Calling
.paddingmore than once adds the amounts together.
Fixed sizes with .frame
Section titled “Fixed sizes with .frame”.frame(width:height:) gives a view an exact size:
Text("Fixed").frame(width: 120, height: 40).background(.yellow)The view’s content is centered inside the frame (see Alignment to place it elsewhere). Text that doesn’t fit in the width wraps onto more lines. You can give just one of the two; the other then comes from the content as usual.
.frame also takes minWidth:, maxWidth:, minHeight: and maxHeight:,
for views that grow or shrink within limits. Those are covered in
Alignment.
How sizes are decided
Section titled “How sizes are decided”When Tessel lays out a window, each view gets offered some space and picks its size. Knowing the rules helps when a layout doesn’t come out as you expect.
Most views are exactly as big as their content. A Text is as big as its
text (and wraps onto more lines when it’s offered less width than it needs), a
Button fits its label, an Icon follows the font size, and a stack fits its
children plus spacing.
Some views are flexible and take the space they’re offered:
| View | Grows |
|---|---|
Spacer() | along its stack (sideways in an HStack, downward in a VStack) |
TextField | in width |
Divider() | across its stack |
Scroll, CodeEditor, TabView | in both directions |
any view with .frame(maxWidth:) or .frame(maxHeight:) | in that direction, up to the maximum |
A fixed .frame(width:) or .frame(height:) turns growing off in that
direction.
A stack with something flexible inside becomes flexible too. An HStack
containing a Spacer stretches across the whole width it’s offered, which is
how Text("Left"), Spacer(), Text("Right") reaches both edges.
Stacks share out their space in two rounds: first every fixed-size child gets what it needs, then the flexible children split what’s left equally. If there are no flexible children, the children are packed together in the middle of the stack.
The window centers its content. The app’s body is placed in the middle of
the window, at its natural size, unless something flexible inside it makes it
fill the window. That’s why a simple app floats in the center, and one with a
Spacer, Scroll or TabView in its outer stack fills the window edge to
edge.
To see what size each view actually got, run your app with the dump script
command; see Testing your UI.